
The golf season is underway, and your golf carts might require new batteries. Do you know How to Remove Golf Cart Batteries? You will get here everything about the Golf Cart Batteries. Waiting for maintenance to be finished can be frustrating, but replacing the batteries doesn’t have to be a difficult task with the help of this guide and some effort.
Cart batteries usually come in sets of six, allowing power to be amplified across circuits. To remove the cables, start with the negative or black wire on one battery, followed by the positive or red wire. To remove your golf cart batteries you need to follow some simple steps.
Removing Golf Cart Batteries: A Step-by-Step Guide
Swapping out your golf cart batteries is a straightforward process, but safety and proper technique are crucial. Here’s a step-by-step guide to help you navigate the task:
Preparation
- Safety First: Wear protective gloves and eyewear. Golf Batteries contain sulfuric acid, which can cause severe burns.
- Gather Tools: You’ll need a wrench or socket set (sizes will vary depending on your cart model), a battery strap (optional but highly recommended), and a clean, well-ventilated workspace.
- Power Down: Turn off the cart and disconnect any chargers. Ensure the cart is in Park and the parking brake is engaged.
Disconnecting the Batteries
- Locate the Batteries: They’re usually under the seat or in a dedicated compartment.
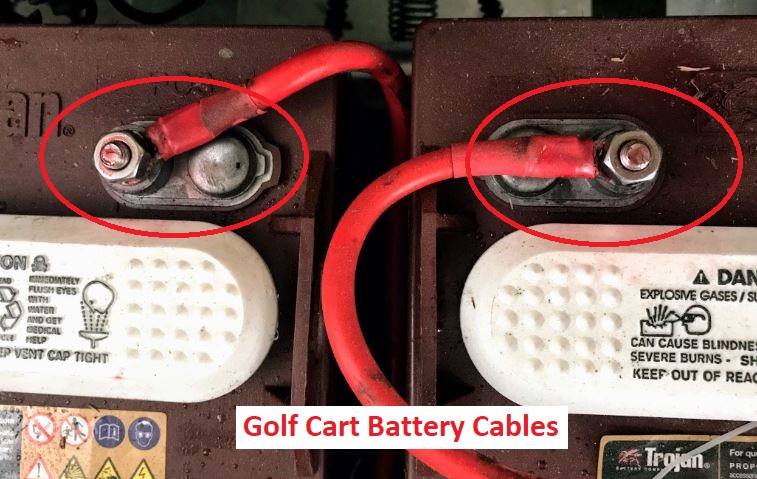
- Identify Terminals: Terminals are typically marked with “NEG” (negative) for black and “POS” (positive) for red.
- Disconnect the Negative Cable First: Loosen the nut on the negative terminal using the wrench or socket. Important: Never touch the metal wrench/socket to both terminals simultaneously, as this can cause a dangerous spark.
- Disconnecting Negative cable from Golf cart battery
- Disconnect the Positive Cable: Repeat step 3 for the positive terminal.
Removing the Batteries
- Secure the Battery (Optional): If using a strap, loop it around the battery and secure it. This makes lifting and carrying easier and safer.
- Unfasten Hold-Down Brackets: Locate the brackets holding the batteries in place. Depending on your cart model, they might have nuts or latches. Unfasten them. Unfastening Hold down brackets on golf cart batteries.
- Lift and Remove the Battery: Carefully lift the battery out of the compartment. It’s heavy, so use proper lifting Technique and avoid twisting your back. Dispose of the old battery responsibly at a designated recycling facility.
Bonus Tips
- Take Pictures: Before disconnecting anything, take pictures of the battery arrangement and cable connections. This will be helpful for reassembly.
- Clean the Terminals: Use a wire brush to clean any corrosion from the battery terminals before installing the new ones.
- Double-Check New Batteries: Ensure the new batteries match the voltage, size, and terminal configuration of the old ones.
Read also related topics: Troubleshooting Club Car Gas Golf Cart Problems
Will a Golf Cart Fit in a Short Bed Pickup?
How to Trick Golf Cart Charger?
And How Long Will a 48-Volt Golf Cart Run?
How Do I Install New Batteries in My Golf Cart?
Tools you will need
- Tools used for turning screws
- Wrenches or Socket Sets
- Cleaning agent for terminals
- Brush made of wire
- Terminal Guards
- Hand coverings
- Protective Eyewear
Steps to install-new Batteries in My Golf Cart
1. Power off and disconnect
Ensure that the golf cart is switched off and not connected to any charger before starting.
2. Locate the batteries on Golf Cart
Most golf carts have their batteries located under the seat for easy access. After removing the seat and accessing the battery compartment, take a picture or sketch the battery arrangement for easy reconfiguration.
3. Double-check the new batteries
Before removing the old batteries, ensure that the new ones are the correct size and voltage.
4. Disconnect the batteries
To disconnect the batteries, remove one battery at a time. Start by disconnecting the main battery’s negative (black) cable first, followed by the positive (red) cable. Repeat this for each battery until they are all disconnected. Make sure to safely secure the cable ends to prevent accidental contact.
5. Remove the brackets
After disconnecting all the batteries, remove the brackets that hold them in place. Carefully pry them loose if necessary. Set them aside.
6. Remove the batteries
Remove the old batteries and set them aside. Use a battery strap to easily pick up and move them. Battery straps are available at your local Batteries Plus store.
7. Inspect the battery compartment
Clean the compartment by removing any debris and wiping it down before inserting the new batteries.
8. Clean the connectors
To clean and prevent corrosion on battery connectors, use the cleaning spray and wire brush from your kit. Spray and scrub the connections to remove any existing buildup. Apply the terminal protection spray to each connector to prevent future corrosion.
9. Insert new batteries
Put the terminal protectors on each terminal of the new batteries for added corrosion protection. Insert the new batteries into the compartment in the same configuration as the old ones. Use your picture or drawing as a reminder if needed. Tighten the brackets to secure the batteries in place, keeping in mind that it’s a tight space.
10. Connect new batteries
Connect the batteries one at a time, starting with the negative incurable then the positive. Reconnect each battery in the same order until all are connected. Connect the main battery’s positive terminal and then the negative.
11. Charge it again
Before taking your cart for its first ride, it is recommended to connect your new batteries to a charger. Though they come with some charge, using them even when slightly depleted can reduce their life expectancy.
12. Return the old batteries
After installing the new batteries, return the old ones to the store to receive your core deposit refund.
Types of batteries for golf carts
Powering Your Ride: A Guide to Golf Cart Batteries
The humble golf cart battery: the unsung hero powering your leisurely rounds on the Golf course. But not all batteries are created equal, and choosing the right one for your cart can make a significant difference in performance, lifespan, and even your wallet. So, before you dive into a sea of lead and acid, let’s explore the different types of golf cart batteries available:
1. Flooded Lead-Acid (Wet Cell)
The traditional workhorse, these batteries are the most affordable option. They require regular maintenance (adding water!) and have a shorter lifespan than other types, but they’re robust and get the job done. Think of them as the trusty pickup truck of the battery world.
2. Absorbed Glass Mat (AGM)
AGM batteries take the lead (pun intended). They’re sealed, eliminating the need for maintenance, and can handle higher temperatures and vibrations better than flooded batteries. They cost more upfront, but their longer lifespan and ease of use make them a compelling choice for many golfers. Picture them as the sleek SUV of the battery clan.
3. Gel Lead-Acid
Similar to AGM batteries, gel batteries are sealed and maintenance-free. However, they’re even more tolerant of heat and vibration, making them ideal for hilly courses or extreme climates. However, they also come with the highest price tag, akin to the luxurious sports car of the battery world.
4. Lithium-Ion
The new kid on the block, lithium batteries offer superior performance with lighter weight, longer range, and faster charging times. They’re also virtually maintenance-free. But their sky-high price tag might have you thinking twice, like contemplating a private jet instead of a commercial flight.
Choosing the Right Battery
The best battery for your cart depends on your budget, driving habits, and course conditions. Consider these factors:
- Budget: Flooded lead-acid are the cheapest, while lithium-ion are the most expensive.
- Maintenance: AGM and gel batteries are maintenance-free, while flooded batteries require regular watering.
- Performance: Lithium-ion batteries offer the best range and power, while flooded batteries have the lowest performance.
- Climate: Gel batteries excel in hot climates, while flooded batteries are less forgiving.
With the right information and a bit of thought, you can choose the perfect battery to keep your golf cart running smoothly and extend your fun on the course.
What is the process for disconnecting golf cart batteries for storage?
Park it, Power Down, Disconnect:
- Park & Brake: Park your cart securely and engage the parking brake.
- Power Off: Turn off the cart and unplug any chargers.
- Black First: Loosen the nut on thenegative (black) terminal, never touching both terminals with tools.
- Red Last: Repeat for the positive (red) terminal.
- Lift & Out: Remove any hold-down brackets and carefully lift the batteries out.
That’s it! Safe storage and a smooth restart await.
Don’t forget to wear gloves and eye protection when recycling old batteries.
People also ask about Golf Cart Batteries
Which battery terminal to disconnect first on the Golf cart?
Your cart batteries are typically arranged in sets of six to amplify power across circuits. To remove the cables, start with the negative (black) wire on one battery, followed by the positive (red) wire.
How can the golf cart battery be best maintained?
Ensure that you fully charge the golf cart batteries after every use using a compatible battery charger and following the manufacturer’s instructions for a complete charge cycle. Avoid running the battery down to zero charge as doing so can reduce its lifespan.
Can I unplug my golf cart before fully charged?
Allowing the battery you need to fully discharge before recharging it enhances its overall performance and prolongs its operational lifespan. The most effective way to maintain your battery is to fully charge it and then disconnect it from the vehicle socket.
How do I know if my golf cart battery is good?
3 quick steps to know if your golf cart battery is good so let’s check:
1. Voltage: Fully charged? 12.7V+ for 12V, 8.4V+ for 8V. Lower? Likely bad.
2. Power: Struggles to climb hills, takes longer to charge, runs shorter trips? Battery’s weakening.
3. Visuals: Bulging, leaking, corrosion? Replace immediately!
If unsure, a voltmeter or hydrometer test confirms its health
Last Word
Remember, safety is paramount when working with batteries. If you’re unsure about any step, consult your cart’s owner’s manual or seek help from a qualified mechanic.
With these steps and a little caution, removing your golf cart batteries will be a breeze, paving the way for a smooth ride with fresh power!