
Forget gas pumps and oil changes, your golf cart thrives on sunshine and a little TLC. Do you know How to Check Golf Cart Battery Water Level? You will get here step-by-step guide about it. Cruising around on a beautiful afternoon becomes a cherished memory, not a maintenance chore. But just like any vehicle, keeping it running smoothly requires some basic care. One key element is checking the battery’s water level.
Unlike modern car batteries, golf carts (usually flooded lead-acid) need occasional watering. This ensures a healthy level of electrolyte solution, a mix of water and sulfuric acid, crucial for proper functioning. While car batteries are relatively self-contained, golf cart batteries rely on this water, which can evaporate over time. This exposed battery can lead to a decrease in performance and a shorter lifespan.
But the good news? Checking your golf cart battery water level is a breeze. Anyone can do it at home with a few simple steps and the right tools. In no time, you’ll have your battery properly hydrated and ready to power your next adventure.
How to Check Golf Cart Battery Water Level?
If you want to check the Golf Cart Battery Water Level you have to follow these simple steps.
Step-1 Ensure Safety First:
Gathering Your Supplies:
You won’t need an elaborate toolbox for this task. Here’s what to grab:
- Distilled Water: This is vital. Regular tap water contains minerals that can harm your batteries.
- Baking Soda (Optional): This can help neutralize any acid spills if needed (mix a baking soda and water paste for application).
- Rags: To keep things clean and dry while you work.
- Flashlight: To peer into the battery cells for better visibility.
Check Only After it is Fully Charged:
Only check the water level after a full charge. The electrolyte level fluctuates during charging, so an accurate reading is crucial.
Step-2 Checking the Level:
- Locate the Batteries: They’re usually found under the seat or in a designated compartment at the front of the cart.
- Identify the Vent Caps: Each battery cell will have a removable cap, often with a visible indicator for proper water level.
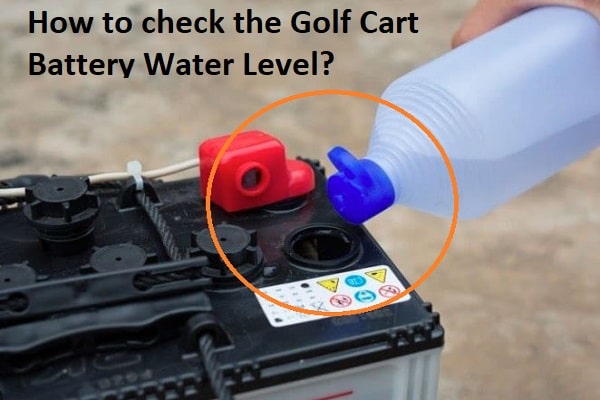
- Inspect Each Cell: Carefully remove the vent caps (one at a time) and look inside the fill well. You’ll see the electrolyte solution and the battery plates.
Step-3 Understanding the Levels:
- Minimum Level: The absolute minimum level is just above the top of the battery plates. If the level is below this point, add a small amount of distilled water after a full charge.
- Optimal Level: Ideally, the electrolyte level should be about 1/8 inch below the bottom of the fill well. This is usually indicated by a line or groove on the vent cap itself.
- Power Down: It’s important to check the water level after a full charge. This ensures an accurate reading, as the electrolyte solution (a mixture of water and sulfuric acid) expands during charging.
- Identify the Cells: Most golf cart batteries have six individual cells, each with a removable cap. Locate these caps and ensure they’re cool to the touch before proceeding.
- Peeking Inside: Carefully remove each cap and take a peek inside. You’ll likely see a set of lead plates submerged in the electrolyte solution. There should be a water level indicator on the inside of the cell (consult your battery manual if unsure).
- Water Level Wisdom: The ideal water level is just below the bottom of the indicator or about 1/8 inch below the top of the cell. If the level is low, proceed to the next step.
- Top Up Time: Use your distilled water and a funnel (optional) to carefully add water to each cell until it reaches the proper level. Don’t overfill!
Post-Watering Checkups:
- Once all cells are topped up, replace the caps snugly.
- Clean any spills with a damp rag dipped in baking soda solution (if needed).
- Dispose of the used water and rags properly.
Keeping it Consistent:
- Make checking your golf cart battery water level a regular habit, ideally every 1-2 months, especially during hot weather when evaporation increases.
- If you notice a rapid decrease in water level, it could indicate a battery issue. Consult a qualified golf cart technician for further diagnosis.
Step-4 Adding Distilled Water (if necessary):
- Use Only Distilled Water: Tap water contains minerals that can harm the battery. Use only distilled water for topping up.
- Add Water Slowly: Add water slowly, using a squeeze bottle or funnel. Overfilling can dilute the acid and damage the battery.
- Re-check and Repeat (if needed): After adding a small amount of water, wait a few minutes and re-check the level. Repeat this process until the level reaches the optimal point.
Step-5 Things to Remember:
- Don’t Overfill: Overfilling can cause the electrolyte solution to spill out when the battery heats up, leading to corrosion and damage.
- Clean Up Spills: If you accidentally spill any water or electrolyte solution, neutralize it with a baking soda and water mixture. Rinse thoroughly with clean water.
- Consult the Manual: If you’re unsure about any aspect of this process, refer to your golf cart’s owner’s manual for specific instructions.
- Replace the Caps Securely: A snug fit prevents leaks and keeps contaminants out.
Read also more related topics: How to Fix Electric Club Car Golf Cart Jerky Acceleration?
10 Troubleshooting Club Car Gas Golf Cart Problems
Will a Golf Cart Fit in a Short Bed Pickup?
Golf Cart Jerking When Accelerating
STORING GOLF CART BATTERIES
Maintaining the performance of your golf cart battery is essential when storing it for a long time. Here are the steps to follow:
- Fully charge the batteries: Make sure to charge the batteries completely before storing the cart to avoid solation, which may happen if lead-acid batteries are left in a discharged state for an extended period.
- Disconnect the batteries: Once the batteries are fully charged, disconnect the cables or utilize a battery disconnect switch to avoid gradual discharge.
- Storage that is cool and dry: Store the golf cart and batteries in a cool, dry place away from extreme temperatures and humidity. Consider upgrading your charger for automatic maintenance-mode charging during off-season storage or regular duty-cycle charging to ensure proper battery maintenance throughout the year.
Top 5 Golf Cart Batteries
1. Trojan T-105
Renowned for its deep-cycle capacity, the Trojan T-105 Plus offers long-lasting performance with a rugged design, making it a top choice for frequent golfers.
The battery’s technology offers a dense paste that ensures long-lasting capacity and total ampere-hours for increased operating power.
2. Duracell GC2
This battery combines durability with consistent power output, ensuring your golf cart runs smoothly over extended periods, even in challenging conditions.
This leads to extended lifespans and better performance throughout the cycles. The external characteristics reflect innovative ideas. A battery has been developed by engineers to be highly robust and easy to use. The robust polypropylene cases are designed to endure impact without harming the cells. The twist-and-release vent caps allow for easy cap removal, and a new lifting system has been created for maximum convenience.
3. VMAXTANKS 6V AGM Battery
Maintenance-free and spill-proof, the VMAXTANKS AGM Battery is designed for reliability with high performance, perfect for those looking for a hassle-free option.
Recommended Charging Options
- AC Chargers: Any reputable brand AGM charger with Smart & Microprocessor control that meets the specified requirements can be utilized. Guide to Battery Charging.
- Solar Panel: 175W-450W (120W can be utilized if the Depth of Discharge does not surpass 50%).
4. Mighty Max ML35-12
A compact yet powerful option, the Mighty Max ML35-12 delivers reliable energy, is easy to install, and works well in both hot and cold environments.
- The ML35-12 SLA is a UL Certified 12V 35AH Sealed Lead Acid (SLA) rechargeable battery that is maintenance-free.
- Specifications: 7.76 inches in length, 5.12 inches in width, and 7.01 inches in height. The listing comprises only the Battery and Screws, excluding wire harnesses or mounting accessories.
- A rechargeable battery that is mountable in any orientation, resistant to shocks and vibrations, with long-lasting high performance in both high and low temperatures.
5. Lifeline Marine AGM Battery
Though primarily a marine battery, its superior construction and deep cycling capabilities make it an excellent choice for golf carts, offering exceptional longevity.
The Lifeline GPL-4CT is a premium AGM battery manufactured in the United States, known for its high performance and durability. It boasts a low self-discharge rate of 2% per month at 77F (25C) and minimal off-gassing under normal conditions. With no sulfuric acid leaks or clean-up required, this battery offers more power in a compact design compared to traditional options. The GPL-4CT can handle charging amperages up to 550 amps or 250% of its Amp Hour Capacity, thanks to its low internal resistance. Featuring M8 Threaded Insert (Cooper Alloy) Terminals, this 6V battery weighs 66 lbs. and provides Cold Cranking Amps of 681095329250750.
Final Note
In conclusion, keeping your golf cart battery water level topped up is a small investment that pays off in a big way. By following these steps, you can prevent premature battery failure and extend the lifespan of this crucial component. A well-maintained battery translates to more rounds on the course, more joy rides with friends, and ultimately, a smoother golfing experience.
So, grab your safety gear, distilled water, and flashlight – a few minutes of preventative maintenance can ensure your golf cart is ready to roll whenever you are.