
Adding lights to your 48-volt golf cart is a smart upgrade. It improves safety, allows night driving, and makes your cart look better.
But here’s the problem:
You cannot connect lights directly to a 48V battery. Doing so can damage your lights and electrical system.
Don’t worry—this guide will walk you through everything in a simple and clear way. You’ll learn:
- How to wire lights safely
- What tools you need
- How to avoid common mistakes
Whether you own a Yamaha or Club Car, this guide is beginner-friendly and easy to follow.

Understanding a 48-Volt Golf Cart System
Before you start, it’s important to understand the basics.
A 48-volt golf cart usually has:
- 6 batteries (8V each) or 8 batteries (6V each)
- A controller
- A wiring system
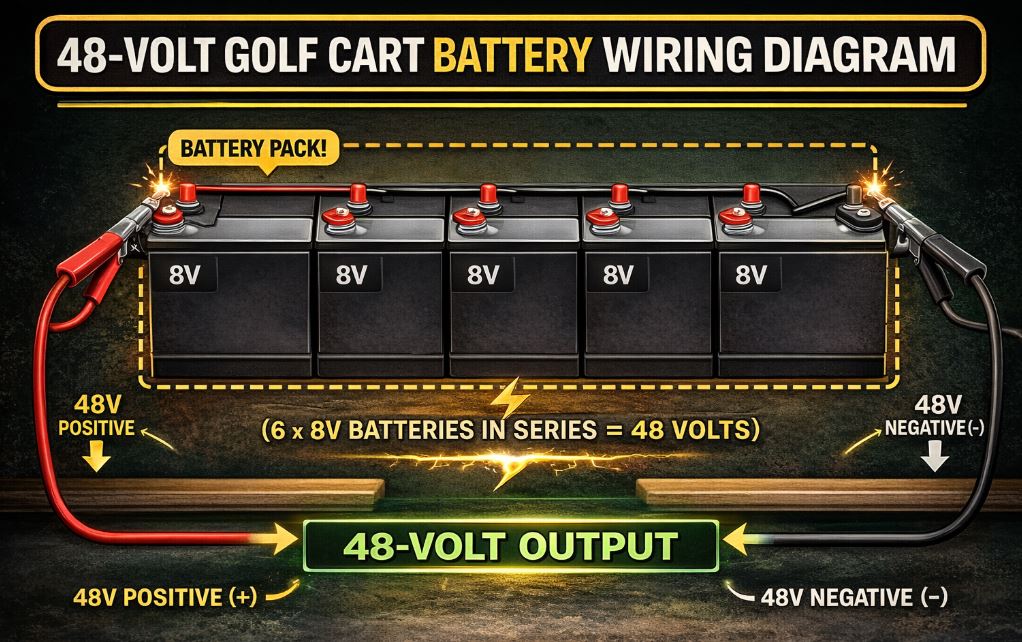
These batteries are connected in series, which means their voltages add up to 48V for a Golf cart.
Why You Need a Voltage Reducer
Most golf cart lights run on 12 volts, not 48 volts.
So, you need a voltage reducer.
It converts 48V into 12V and protects your lights from damage.
Tools and Materials You’ll Need
Before you begin, gather everything you need:
- LED light kit (headlights and taillights)
- 48V to 12V voltage reducer
- Wire connectors
- Electrical tape
- Inline fuse
- Toggle or dash switch
- Multimeter
- Wire cutter and crimper
- Screwdriver and drill
Using good-quality tools will make the job easier and safer.
Safety Tips (Don’t Skip This)
Always follow these safety steps:
- Disconnect the battery before starting
- Use insulated tools
- Keep wires away from water
- Avoid touching exposed wires
- Double-check all connections
These simple steps can prevent serious damage or injury.
48-Volt Golf Cart Battery Wiring Diagram (Simple Explanation)
You will get here the 48-volt golf cart battery wiring diagram with explanations.
In a 48V system:
- Batteries are connected positive to negative
- The total voltage equals 48V
Where Should You Connect the Lights?
You have two options:
Best Option: Full Battery Pack + Voltage Reducer
- Safe and reliable
- Keeps batteries balanced
Not Recommended: Single Battery Tap
- Drains one battery faster
- Shortens battery life
Always use a voltage reducer with the full battery pack.
Read also more related topics: How to Jump Start a Golf Cart?
When Is the Best Time to Buy a Golf Cart?
How to Read Golf Greens for Speed and Break?
Step-by-Step: How to Wire Lights on a 48-Volt Golf Cart
Follow these simple steps:
Step 1: Disconnect the Battery
Turn off the cart and remove the negative terminal.
This keeps you safe while working.
Step 2: Install the Voltage Reducer
- Mount it near the battery
- Connect it to the full 48V pack
- Check polarity (positive to positive, negative to negative)
Step 3: Run the Wires
- Run wires from the reducer to the front and back
- Keep wires neat and secure
Tip: Use zip ties and wire covers for protection.
Step 4: Install the Switch
- Place the switch on the dashboard
- Connect it between the reducer and lights
This allows you to turn lights on and off easily.
Step 5: Connect the Lights
- Connect headlights and taillights
- Match positive and negative wires
- Secure all connections tightly
Step 6: Test Everything
- Reconnect the battery
- Turn on the switch
- Check if lights work properly
If everything looks good—you’re done!
How to Wire Lights on a 48-Volt Golf Cart Yamaha
Yamaha carts (like G29/Drive) have slightly different layouts.
Helpful Tips:
- Always use a voltage reducer
- Follow existing wiring paths
- Secure all ground connections
Avoid These Mistakes:
- Skipping the reducer
- Loose wiring
- Wrong connections
Club Car Precedent Light Wiring Diagram 48 Volt (Easy Guide)
Club Car Precedent models are also very popular.
What You Should Know:
- Wiring layout is slightly different from Yamaha
- Some kits come pre-wired
- Others require manual installation
Pro Tips:
- Label wires
- Follow a clean wiring path
- Double-check all connections
Common Mistakes to Avoid
Avoid these common errors:
- Connecting lights directly to 48V
- Using one battery instead of the full pack
- Loose or weak connections
- Wrong wire size
- No fuse protection
Fixing these mistakes early saves time and money.
Troubleshooting Guide
If your lights don’t work, check this:
Lights Not Turning On
- Check fuse
- Check switch
- Test voltage reducer
Flickering Lights
- Loose wires
- Bad connections
Dim Lights
- Weak reducer
- Poor grounding
Blown Fuse
- Short circuit
- Too much load
Why Choose LED Lights?
LED lights are the best option for golf carts.
Benefits:
- Use less power
- Last longer
- Brighter light
- Less heat
They are efficient and perfect for 48V systems.
FAQs
Can I connect lights directly to a 48V battery?
No. It will damage your lights.
Do I really need a voltage reducer?
Yes. It protects your system and ensures proper voltage.
How long does installation take?
Usually 1–3 hours.
Are Yamaha and Club Car kits the same?
Mostly yes, but small adjustments may be needed.
Pro Tips for Better Results
- Use waterproof connectors
- Secure wires with clips
- Label everything
- Install a fuse for safety
Conclusion
Now you know how to wire lights on a 48-volt golf cart in a simple and safe way.
The key points to remember:
- Always use a voltage reducer
- Never connect directly to 48V
- Keep wiring clean and secure
With the right steps, this is an easy DIY project—even for beginners.