
Golf cart batteries may look complicated at first, but once you understand the basics, they are actually quite simple. Many golf cart owners ask the same question: how are golf cart batteries wired?
In this guide, you’ll learn:
- Whether golf cart batteries are wired in series or parallel
- How 36V and 48V golf cart battery wiring works
- Clear explanations with diagrams for beginners
- Special notes for Yamaha 48-volt golf carts
This article uses plain language, step-by-step explanations, and scannable sections so anyone can understand it—even without electrical experience.
Basics of Golf Cart Battery Wiring
What Does “Wiring” a Golf Cart Battery Mean?
Wiring simply means connecting batteries together using cables so they deliver the correct voltage to your golf cart. Each battery has a positive (+) and negative (–) terminal. How these terminals are connected determines the total voltage your cart receives.

Correct wiring is important because:
- It ensures proper power delivery
- It protects electrical components
- It helps batteries last longer
Series vs Parallel Wiring Explained Simply
Before we go further, it’s important to understand the two basic wiring types.
Series Wiring
- Increases voltage
- Positive terminal connects to the next battery’s negative terminal
- Most common setup for golf carts
Parallel Wiring
- Keeps voltage the same
- Increases battery capacity (runtime)
- Rarely used alone in golf carts
Quick rule:
👉 Golf carts mainly use series wiring, not parallel.
Are Golf Cart Batteries Wired in Series or Parallel?
Most people wonder: are golf cart batteries wired in series or parallel?
The short answer is: series wiring.
Why Golf Carts Use Series Wiring
- Golf carts need higher voltage (36V or 48V)
- Series wiring adds voltage together
- Controllers and motors are designed for specific voltages
Parallel wiring is sometimes used in custom or modified carts, but standard factory golf carts almost always use series wiring.
How Are 36V Golf Cart Batteries Wired?
Understanding 36-Volt Systems
A 36-volt golf cart usually uses:
- Six 6-volt batteries
or - Three 12-volt batteries
These batteries are wired in series to reach 36 volts.
36V Golf Cart Battery Wiring Diagram (Explanation)
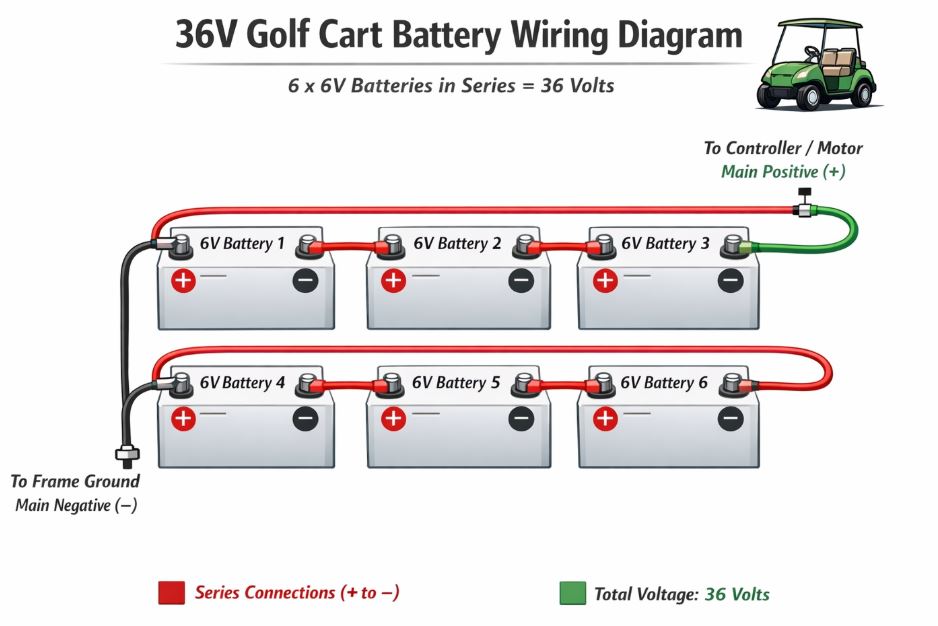
In a 36v golf cart battery wiring diagram, you will see:
- The negative terminal of Battery 1 connects to the positive terminal of Battery 2
- This pattern continues until all batteries are connected
- The final positive and negative terminals connect to the cart’s main cables
Example calculation:
6V × 6 batteries = 36 volts golf cart batteries
Step-by-Step 36V Wiring Process
- Place batteries in the tray
- Connect positive to negative between batteries
- Check all cable connections
- Attach main positive and negative leads
- Test voltage before powering on
Don’t miss knowing also: How many Batteries are in a Golf cart?
How Are 48V Golf Cart Batteries Wired?
Why Modern Golf Carts Use 48V
Most newer use 48 volts golf cart because they:
- Deliver more power
- Improve efficiency
- Provide longer driving range
Golf Cart Battery Diagram 48 Volt (Explanation)
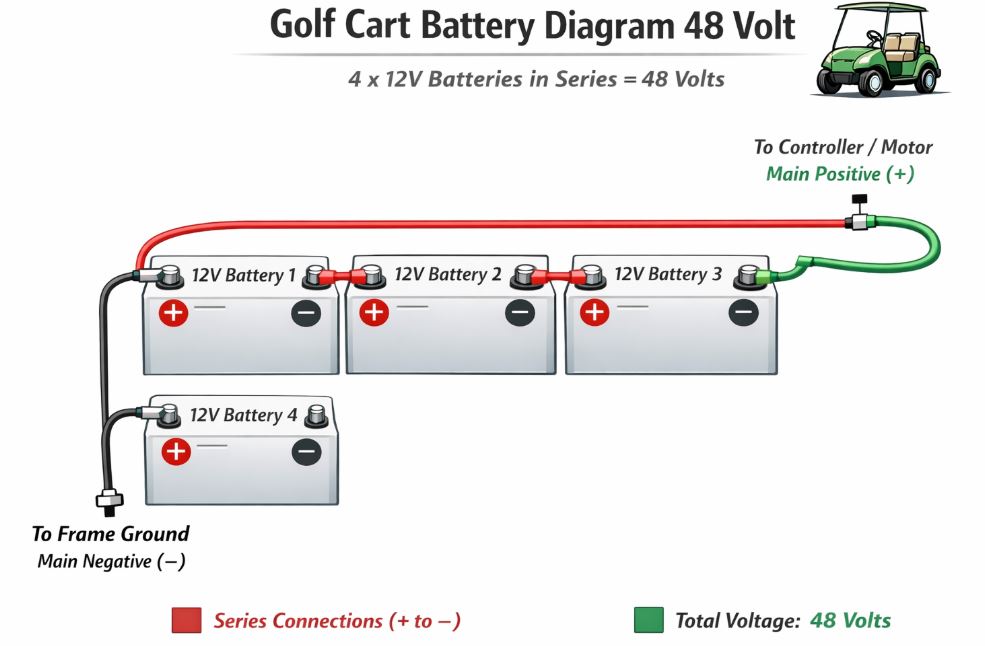
A golf cart battery diagram 48 volt typically shows:
- Six 8-volt batteries
or - Four 12-volt batteries
All batteries are wired in series.
Example calculation:
12V × 4 batteries = 48 volts
48V Wiring Steps Made Simple
- Connect each battery positive to the next battery negative
- Leave one positive and one negative terminal free
- Attach these to the cart’s controller cables
- Double-check polarity before turning the cart on
Yamaha Golf Cart Battery Wiring Diagram 48 Volt
Yamaha-Specific Wiring Notes
Yamaha golf carts follow the same basic series wiring method as other brands. However:
- Battery layout may look different
- Cable routing can vary by model
Yamaha 48V Wiring Diagram Explained
A Yamaha golf cart battery wiring diagram 48 volt usually includes:
- Four 12-volt batteries in series
- Clearly marked main positive and negative cables
- Factory-recommended cable thickness
Always follow Yamaha’s official diagram to avoid wiring mistakes.
Tips for Yamaha Owners
- Never mix old and new batteries
- Use the correct cable gauge
- Clean terminals before reconnecting
Tools and Safety Checklist
Before wiring golf cart batteries, gather these tools:
- Insulated wrench set
- Safety gloves and glasses
- Battery terminal cleaner
- Voltmeter or multimeter
Safety tips:
- Turn off the cart completely
- Remove metal jewelry
- Never short battery terminals
Frequently Asked Questions
Can golf cart batteries be wired incorrectly?
Yes. Incorrect wiring can damage the controller or cause the cart not to run.
Can I mix different battery brands?
No. Always use batteries of the same type, age, and brand.
How do I check if wiring is correct?
Use a voltmeter to confirm the total voltage matches your system.
Can I upgrade from 36V to 48V?
Yes, but it requires new batteries, wiring changes, and a compatible controller.
Conclusion
So, how are golf cart batteries wired?
In most cases, they are wired in series to create either a 36-volt or 48-volt system. Understanding the wiring layout helps you:
- Avoid costly mistakes
- Improve battery performance
- Maintain your golf cart safely
If you follow proper diagrams and safety steps, wiring golf cart batteries becomes simple and stress-free.